| (17 intermediate revisions by 3 users not shown) | |||
| Line 1: | Line 1: | ||
| − | {{Infobox |
+ | {{Infobox Enemy |
|name = Dragon Zombie |
|name = Dragon Zombie |
||
|image = Legends - Death Dragon - 01.png |
|image = Legends - Death Dragon - 01.png |
||
| Line 5: | Line 5: | ||
|jname = |
|jname = |
||
|aname = Death Dragon, Skull Dragon |
|aname = Death Dragon, Skull Dragon |
||
| − | |abil = |
+ | |abil = |
| + | *[[Flame Breath]] |
||
| ⚫ | |||
| + | *[[Poison Breath]] |
||
| ⚫ | |||
| ⚫ | |||
| ⚫ | |||
|eng voice = |
|eng voice = |
||
|jpn voice = |
|jpn voice = |
||
| + | |game = |
||
| − | |game = ''[[Castlevania Chronicles|Chronicles]]''<br />''[[Castlevania: Circle of the Moon|Circle of the Moon]]''<br />''[[Castlevania Legends|Legends]]''<br />''[[Castlevania: Portrait of Ruin|Portrait of Ruin]]'' |
||
| + | ''[[Castlevania Chronicles|Chronicles]]''<br /> |
||
| + | ''[[Castlevania: Circle of the Moon|Circle of the Moon]]''<br /> |
||
| + | ''[[Castlevania Legends|Legends]]''<br /> |
||
| + | ''[[Castlevania: Portrait of Ruin|Portrait of Ruin]]'' |
||
|gallery = Yes |
|gallery = Yes |
||
|stuff1 = |
|stuff1 = |
||
|stuff2 = |
|stuff2 = |
||
}} |
}} |
||
| − | The '''Dragon Zombie''' is a recurrent [[: |
+ | The '''Dragon Zombie''' is a recurrent [[:category:Bosses|boss]] or powerful [[:category:Enemies|enemy]] in the ''[[Castlevania (series)|Castlevania]]'' series. It lost its magic, but has become mindlessly violent. |
==Description== |
==Description== |
||
| Line 22: | Line 28: | ||
==Appearances== |
==Appearances== |
||
===''[[Castlevania Chronicles]]''=== |
===''[[Castlevania Chronicles]]''=== |
||
| − | The [[: |
+ | The [[:category:Chronicles Bosses|boss]] of the second level. [[Simon Belmont (Chronicles)|Simon]] passes the dragon's remains while trekking through the [[Chronicles Block 2|Underground Aqueduct]]. It returns at the end to attack while Simon is stuck on a small raft. The dragon remains hovering on the right side of the screen, attacking in two ways: either it will tip the boat with its tail, or [[Flame Breath|breathe fire]] at Simon. It can be avoided by remaining on the left side of the raft and constantly attacking its head. |
{{Enemy Stats/Chronicles |
{{Enemy Stats/Chronicles |
||
| Line 33: | Line 39: | ||
===''[[Castlevania Legends]]''=== |
===''[[Castlevania Legends]]''=== |
||
| − | This dragon was actually killed by [[Dracula (Legends)|Dracula]] himself in his early years to send a message that he, as the "King of the Dragons", had arrived. Dracula granted it new life to be a part of his own army. The dragon is huge and only its front half is shown onscreen. Its [[Flame Breath|fire-breathing]] ability is ever-present, but it chooses to |
+ | This dragon was actually killed by [[Dracula (Legends)|Dracula]] himself in his early years to send a message that he, as the "King of the Dragons", had arrived. Dracula granted it new life to be a part of his own army. The dragon is huge and only its front half is shown onscreen. Its [[Flame Breath|fire-breathing]] ability is ever-present, but it chooses to spew individual flame blasts sporadically as it moves its head up and down between three possible positions to keep the player guessing while moving. Like other bosses its size, it likes to crash into things using its head to make debris fall from the ceiling to further disrupt [[Sonia Belmont|Sonia]]'s movements. |
{{Enemy Stats/Legends |
{{Enemy Stats/Legends |
||
| − | |Image = [[File:Ddragon.gif]] |
+ | |Image = [[File:Ddragon.gif|110px]] |
| − | |Name = Death Dragon |
+ | |Name = Death Dragon |
| − | |JPN = デス·ドラゴン |
+ | |JPN = デス·ドラゴン |
| − | |HP = - |
+ | |HP = - |
| − | |ATK = - |
+ | |ATK = - |
| − | |Location = [[Legends Stage 2|2. Inside the Castle]] |
+ | |Location = [[Legends Stage 2|2. Inside the Castle]] |
| + | |Description = This legendary monster was slain by Count Dracula<br />himself and then was brought back as a living corpse.<br />The dragon attacks by breathing flames. |
||
}} |
}} |
||
===''[[Castlevania: Circle of the Moon]]''=== |
===''[[Castlevania: Circle of the Moon]]''=== |
||
| − | Dragon Zombies appear as a pair of |
+ | Dragon Zombies appear as a pair of [[:category:Circle of the Moon Bosses|boss]] monsters. Both dragons lie on the floor, with their bodies in an advanced level of decay, and are so bulky they must resort to attack using only their heads. The left dragon attacks by spewing a series of loosely aimed [[fireball]]s, while the right dragon attacks with aimed balls of [[Thunder|electricity]]. Both dragons have the ability to slam into the wall and cause debris to fall from the ceiling. When one dragon dies, the other will devour its companion's remains, regaining 300 [[Hit Points|HP]] in the process; however, doing so leaves it open for attack while feeding, allowing the player to probably deal even more damage than the health it regains. Once both are defeated, the [[Heavy Ring]] can be obtained from the next room. |
{{Enemy Stats/Circle of the Moon |
{{Enemy Stats/Circle of the Moon |
||
| Line 62: | Line 69: | ||
===''[[Castlevania: Portrait of Ruin]]''=== |
===''[[Castlevania: Portrait of Ruin]]''=== |
||
| − | In this game, the Dragon Zombie is a large, |
+ | In this game, the Dragon Zombie is not a boss but a large, uncommon enemy. It can bite, jump forward, wail its tail at the player, and more importantly, [[Poison Breath|breath a large poisonous fume]] that covers a large area of the room. It usually appears in areas where an almost endless horde of [[Mummy|Mummies]] spawn from the ground. |
| + | |||
| + | One can be encountered in the [[Buried Chamber]], another in the [[Sandy Grave]], and yet another one also makes an appearance in [[Boss Rush Mode#Castlevania: Portrait of Ruin|Boss Rush Mode]] (Course 1). |
||
{{Enemy Stats/Portrait of Ruin |
{{Enemy Stats/Portrait of Ruin |
||
| Line 82: | Line 91: | ||
==Item Data== |
==Item Data== |
||
{{Item Table Begin|Dragon Zombie}} |
{{Item Table Begin|Dragon Zombie}} |
||
| + | {{Legends Item Data|Ice}} |
||
| + | {{Circle of the Moon Item Data/Magic Items|Heavy Ring}} |
||
{{Portrait of Ruin Item Data/Weapons|Gladius}} |
{{Portrait of Ruin Item Data/Weapons|Gladius}} |
||
{{Portrait of Ruin Item Data/Weapons|Zweihander}} |
{{Portrait of Ruin Item Data/Weapons|Zweihander}} |
||
| Line 87: | Line 98: | ||
==Gallery== |
==Gallery== |
||
| − | <gallery position="center" captionalign="center |
+ | <gallery position="center" captionalign="center"> |
| − | Chronicles-dragonskeleton.gif|[[Simon Belmont ( |
+ | Chronicles-dragonskeleton.gif|[[Simon Belmont (Chronicles)|Simon]] fighting the '''Skull Dragon''' in ''[[Castlevania Chronicles|Chronicles]]'' |
Legends - Death Dragon - 01.png|'''Death Dragon''' from ''[[Castlevania Legends|Legends]]'' |
Legends - Death Dragon - 01.png|'''Death Dragon''' from ''[[Castlevania Legends|Legends]]'' |
||
Twin zombie dragon.PNG|[[Nathan Graves|Nathan]] fighting the '''Dragon Zombies''' in ''[[Castlevania: Circle of the Moon|Circle of the Moon]]'' |
Twin zombie dragon.PNG|[[Nathan Graves|Nathan]] fighting the '''Dragon Zombies''' in ''[[Castlevania: Circle of the Moon|Circle of the Moon]]'' |
||
| Line 94: | Line 105: | ||
==Trivia== |
==Trivia== |
||
| ⚫ | *In ''[[Castlevania: Circle of the Moon]]'', the right Dragon Zombie can be defeated even before the boss room's door has closed. As a result, by exploiting the [[Dual Set-Up System]], [[Nathan Graves|Nathan]] can [[Skeleton Transformation|transform into a skeleton]] ([[Pluto (card)|Pluto]] + [[Black Dog (card)|Black Dog]]) and start spamming bones. Since one hit with a big bone will likely kill the dragon and the fact that the right dragon will always be there every time Nathan enters the room, as long as the left dragon has not been killed, Nathan can gain big amounts of [[Experience|EXP]] quickly by repeating this process. |
||
| − | [[File:COTM 08 Underground Gallery 20b.PNG|thumb|200px|Using the skeleton form exploit]] |
||
| + | *In ''[[Castlevania: Lament of Innocence]]'', in the first room of the [[Pagoda of the Misty Moon]], the skeletal remains of a winged dragon appear on the floor. |
||
| ⚫ | *In ''[[Castlevania: |
||
| − | [[File:Dracolichdetail.png|thumb|200px|Dracolich art]] |
||
*In ''[[Castlevania: Lords of Shadow|Lords of Shadow]]'', [[Dracula (Lords of Shadow)|Gabriel Belmont]] fights a [[Titan]] boss near the end of the game called the [[Titan#Dracolich Titan|Dracolich]], which are the reanimated remains of a dead dragon. Interestingly enough, the original series' Dragon Zombie was said to have been slain by Dracula in his early years, while Gabriel defeated the Dracolich not long before he became Dracula himself. |
*In ''[[Castlevania: Lords of Shadow|Lords of Shadow]]'', [[Dracula (Lords of Shadow)|Gabriel Belmont]] fights a [[Titan]] boss near the end of the game called the [[Titan#Dracolich Titan|Dracolich]], which are the reanimated remains of a dead dragon. Interestingly enough, the original series' Dragon Zombie was said to have been slain by Dracula in his early years, while Gabriel defeated the Dracolich not long before he became Dracula himself. |
||
| + | |||
| + | <gallery position="center" captionalign="center"> |
||
| + | COTM 08 Underground Gallery 20b.PNG|Using the [[Skeleton Transformation|skeleton form]] exploit in ''[[Castlevania: Circle of the Moon|Circle of the Moon]]'' |
||
| + | Lament_of_Innocence_Zombie_Dragon_Texture.jpg|Texture of the remains at the [[Pagoda of the Misty Moon]] in ''[[Castlevania: Lament of Innocence|Lament of Innocence]]'' |
||
| + | Dracolichdetail.png|[[Titan#Dracolich Titan|Dracolich]] concept art from ''[[Castlevania: Lords of Shadow|Lords of Shadow]]'' |
||
| + | </gallery> |
||
| + | |||
| + | ==See also== |
||
| + | *[[Dragon]] |
||
| + | *[[Zombie]] |
||
==References== |
==References== |
||
Revision as of 20:17, 18 September 2019
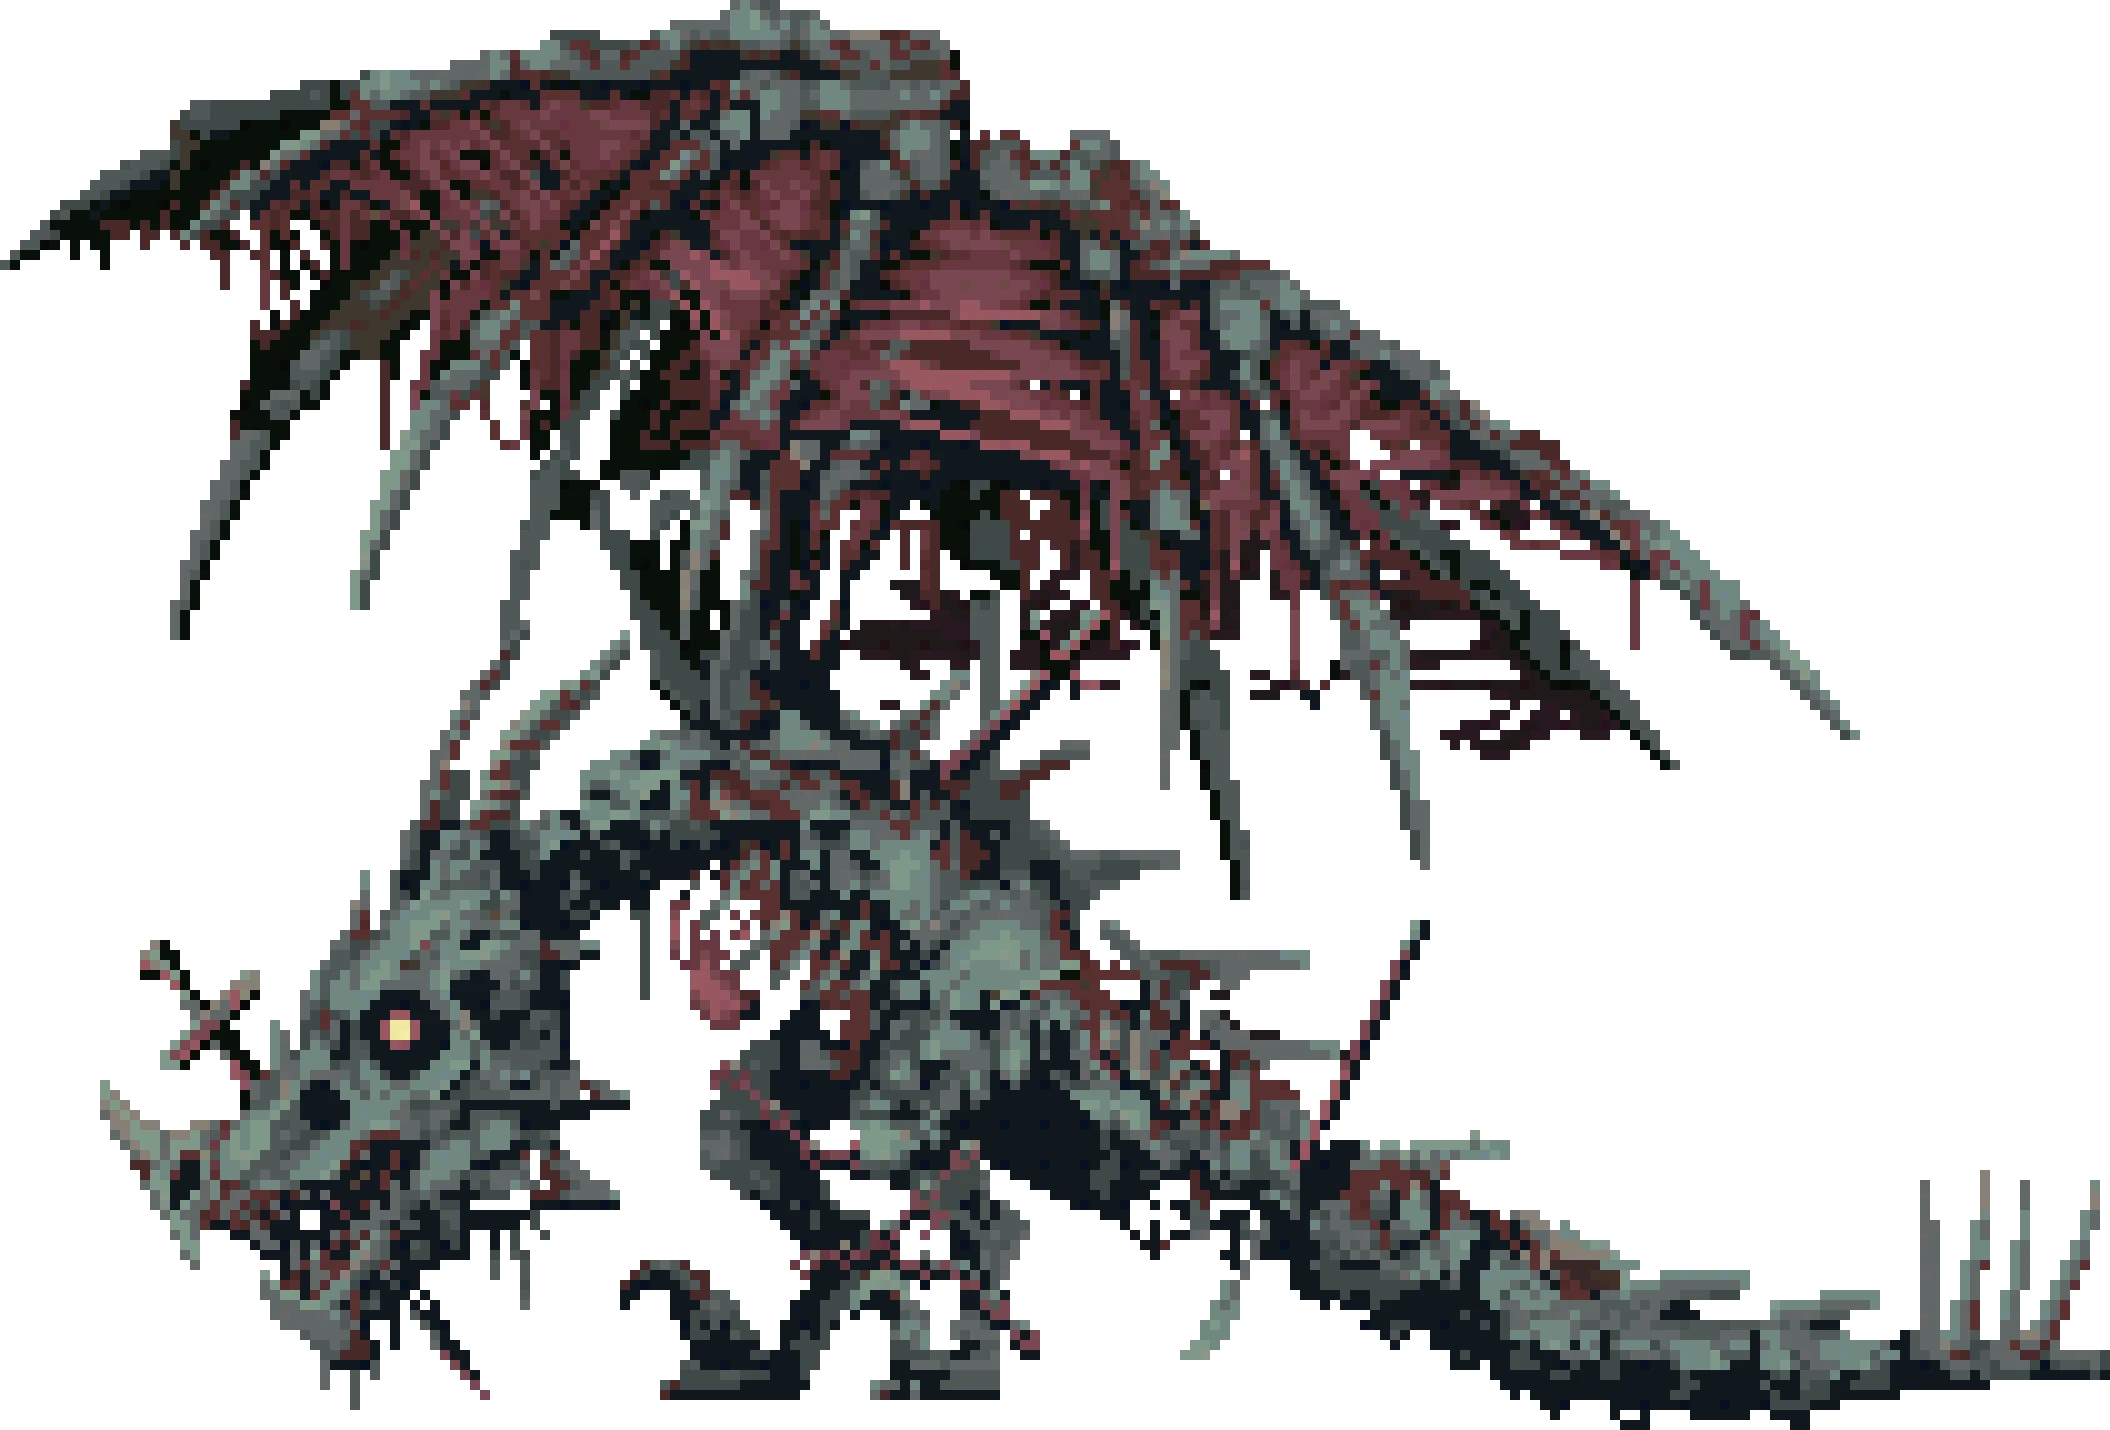
The Dragon Zombie is a recurrent boss or powerful enemy in the Castlevania series. It lost its magic, but has become mindlessly violent.
Description
The Dragon Zombie are the reanimated remains of a dragon. The Death Dragon from Castlevania Legends was slain by Count Dracula and left to guard his castle. The various Dragon Zombies' remains throughout the Castlevania games appear in varying amounts of decay, being full of flesh in Legends and Circle of the Moon, but more skeleton-like in Chronicles and Portrait of Ruin.
Appearances
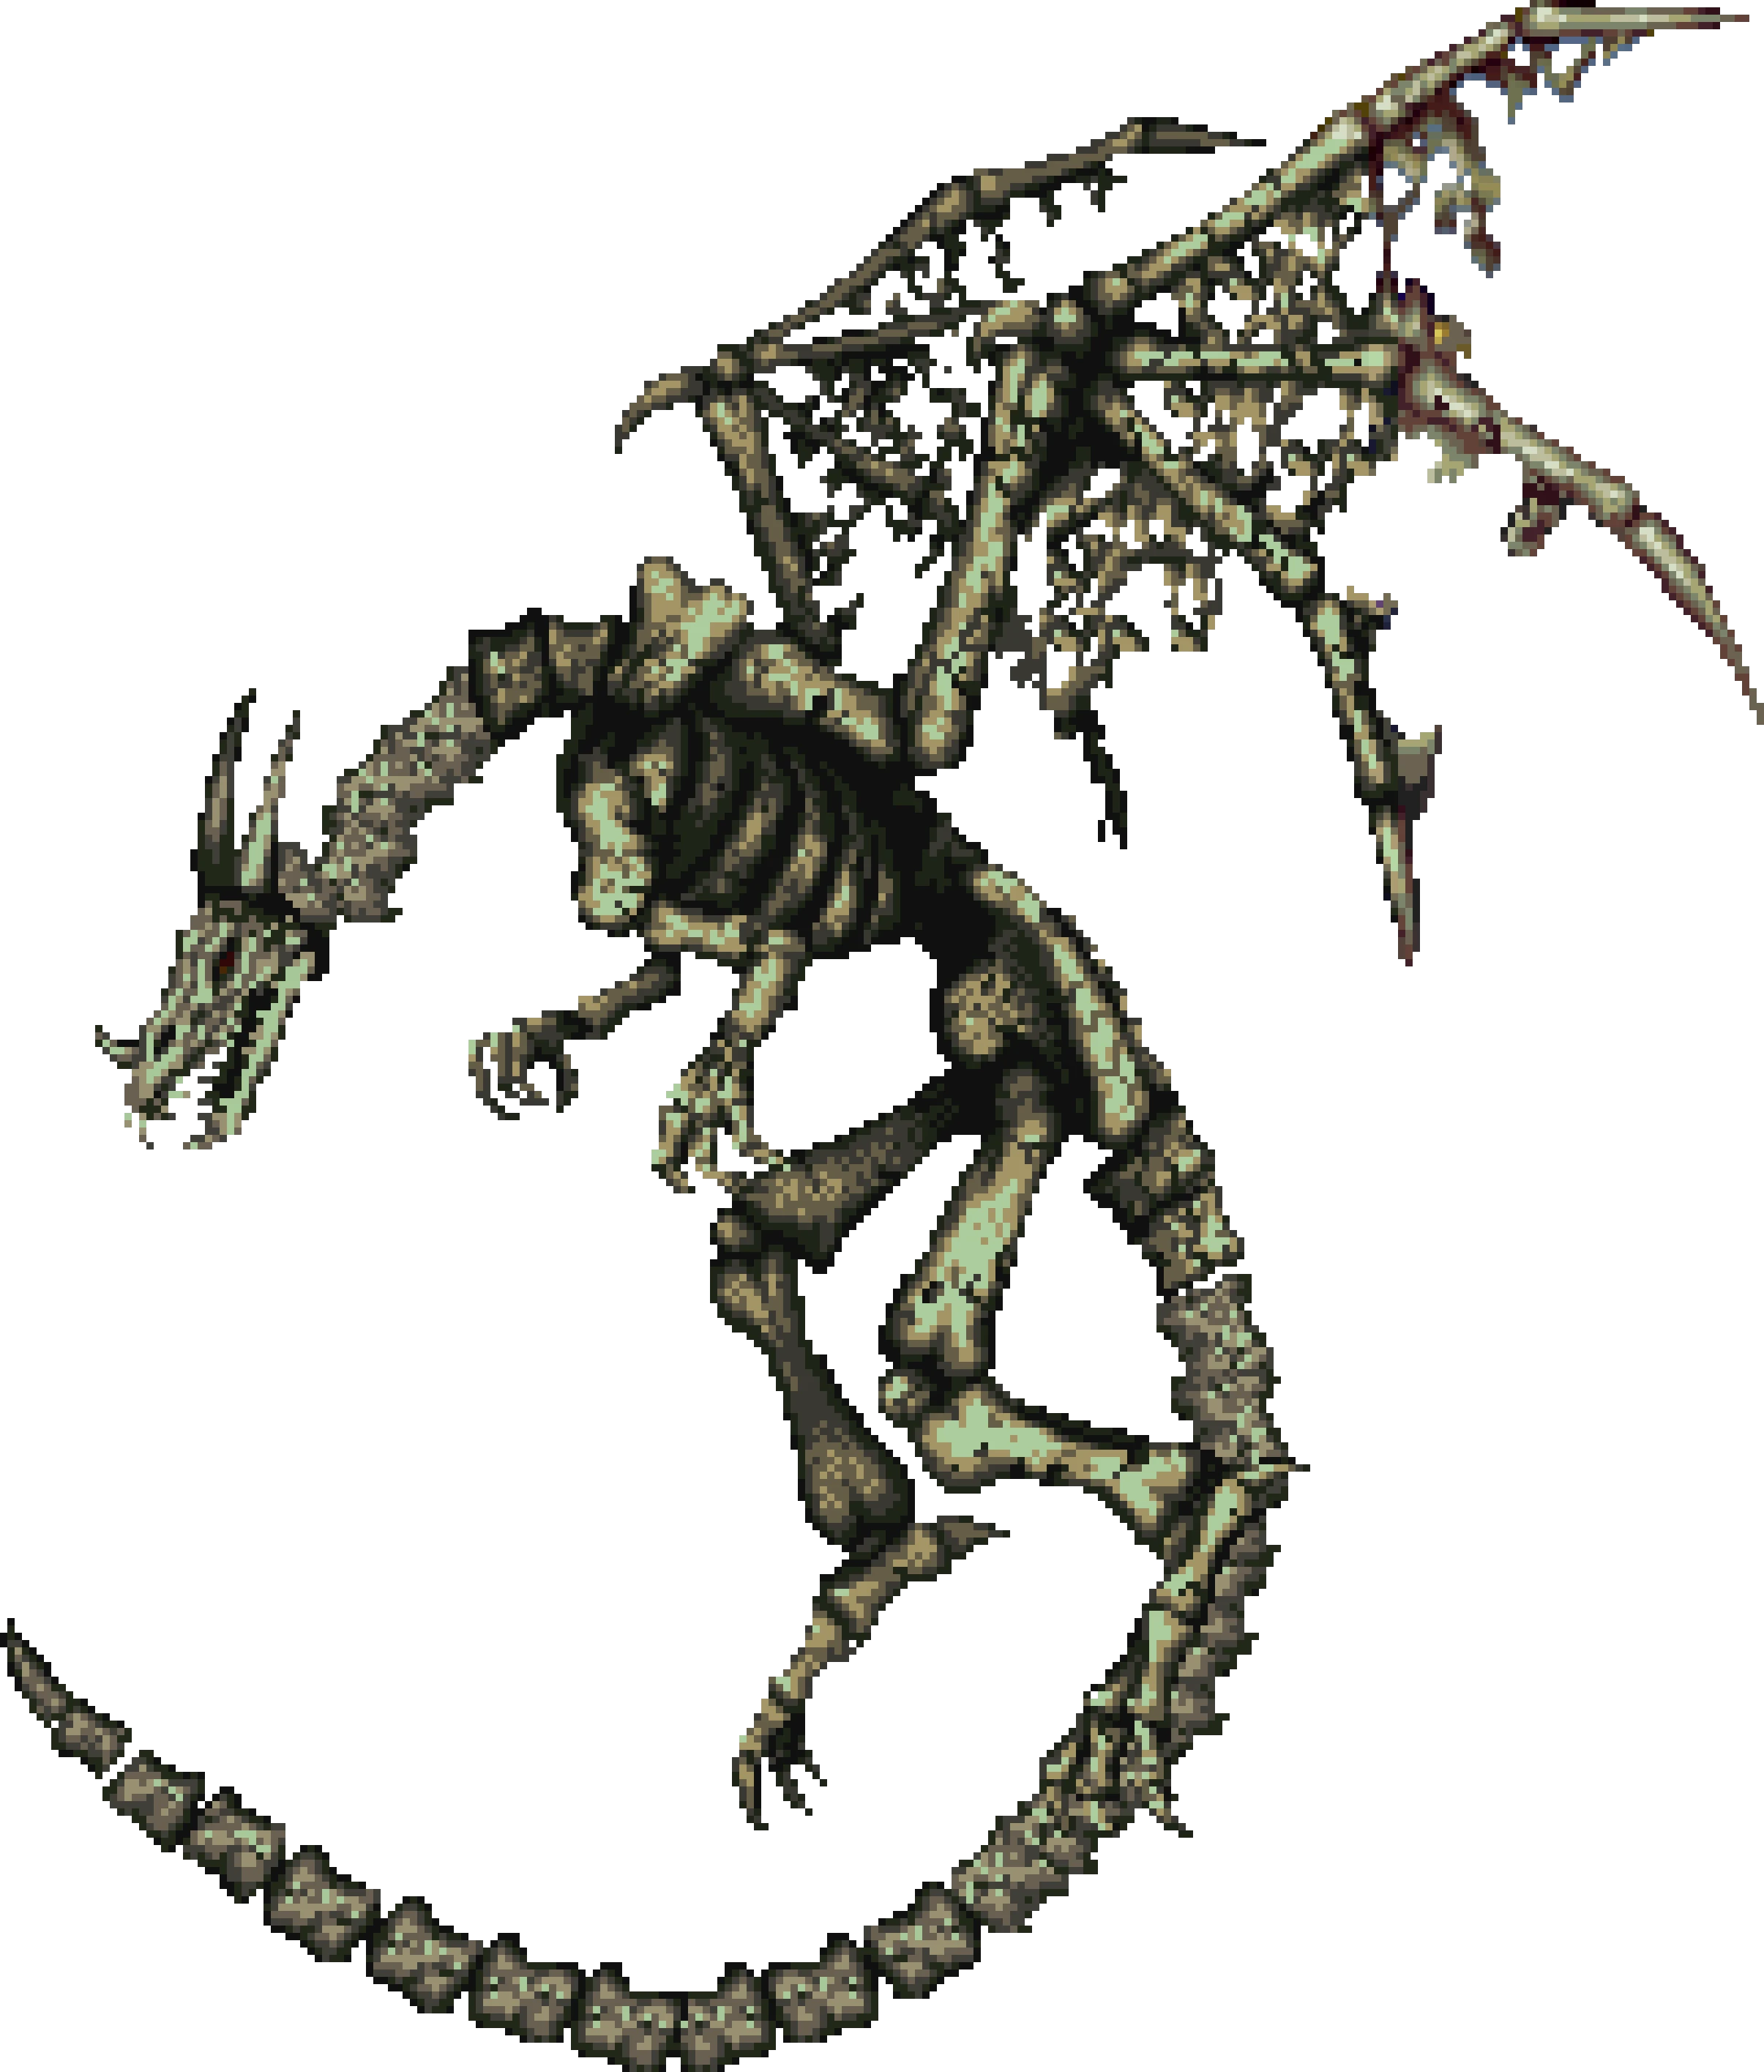
Castlevania Chronicles
The boss of the second level. Simon passes the dragon's remains while trekking through the Underground Aqueduct. It returns at the end to attack while Simon is stuck on a small raft. The dragon remains hovering on the right side of the screen, attacking in two ways: either it will tip the boat with its tail, or breathe fire at Simon. It can be avoided by remaining on the left side of the raft and constantly attacking its head.
|
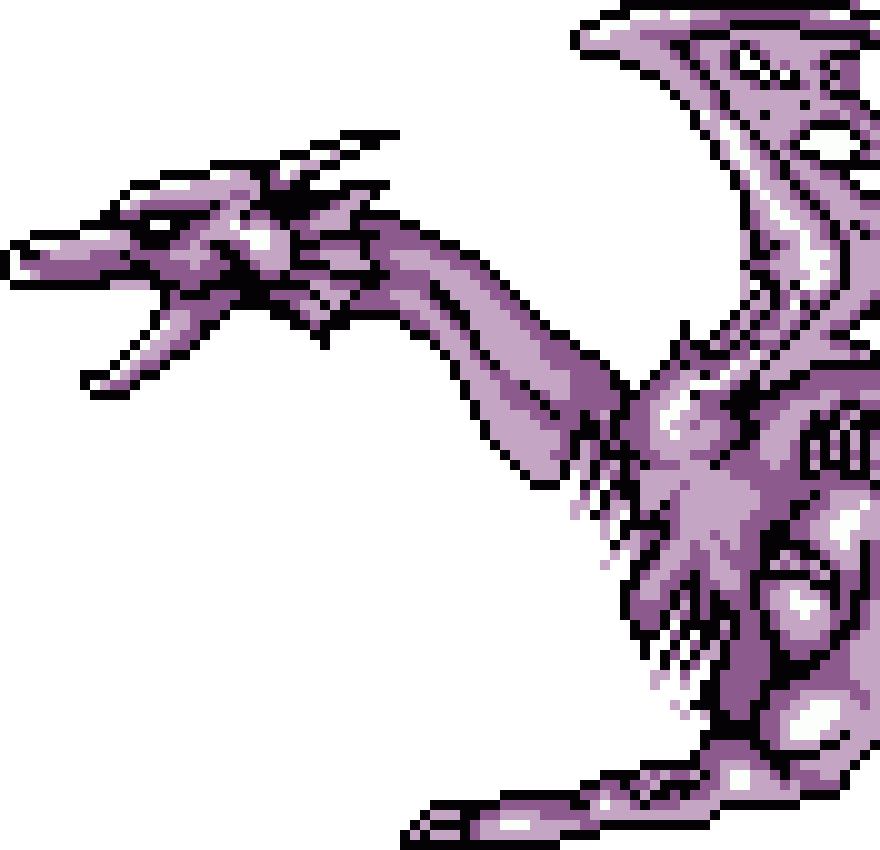
Castlevania Legends
This dragon was actually killed by Dracula himself in his early years to send a message that he, as the "King of the Dragons", had arrived. Dracula granted it new life to be a part of his own army. The dragon is huge and only its front half is shown onscreen. Its fire-breathing ability is ever-present, but it chooses to spew individual flame blasts sporadically as it moves its head up and down between three possible positions to keep the player guessing while moving. Like other bosses its size, it likes to crash into things using its head to make debris fall from the ceiling to further disrupt Sonia's movements.
|
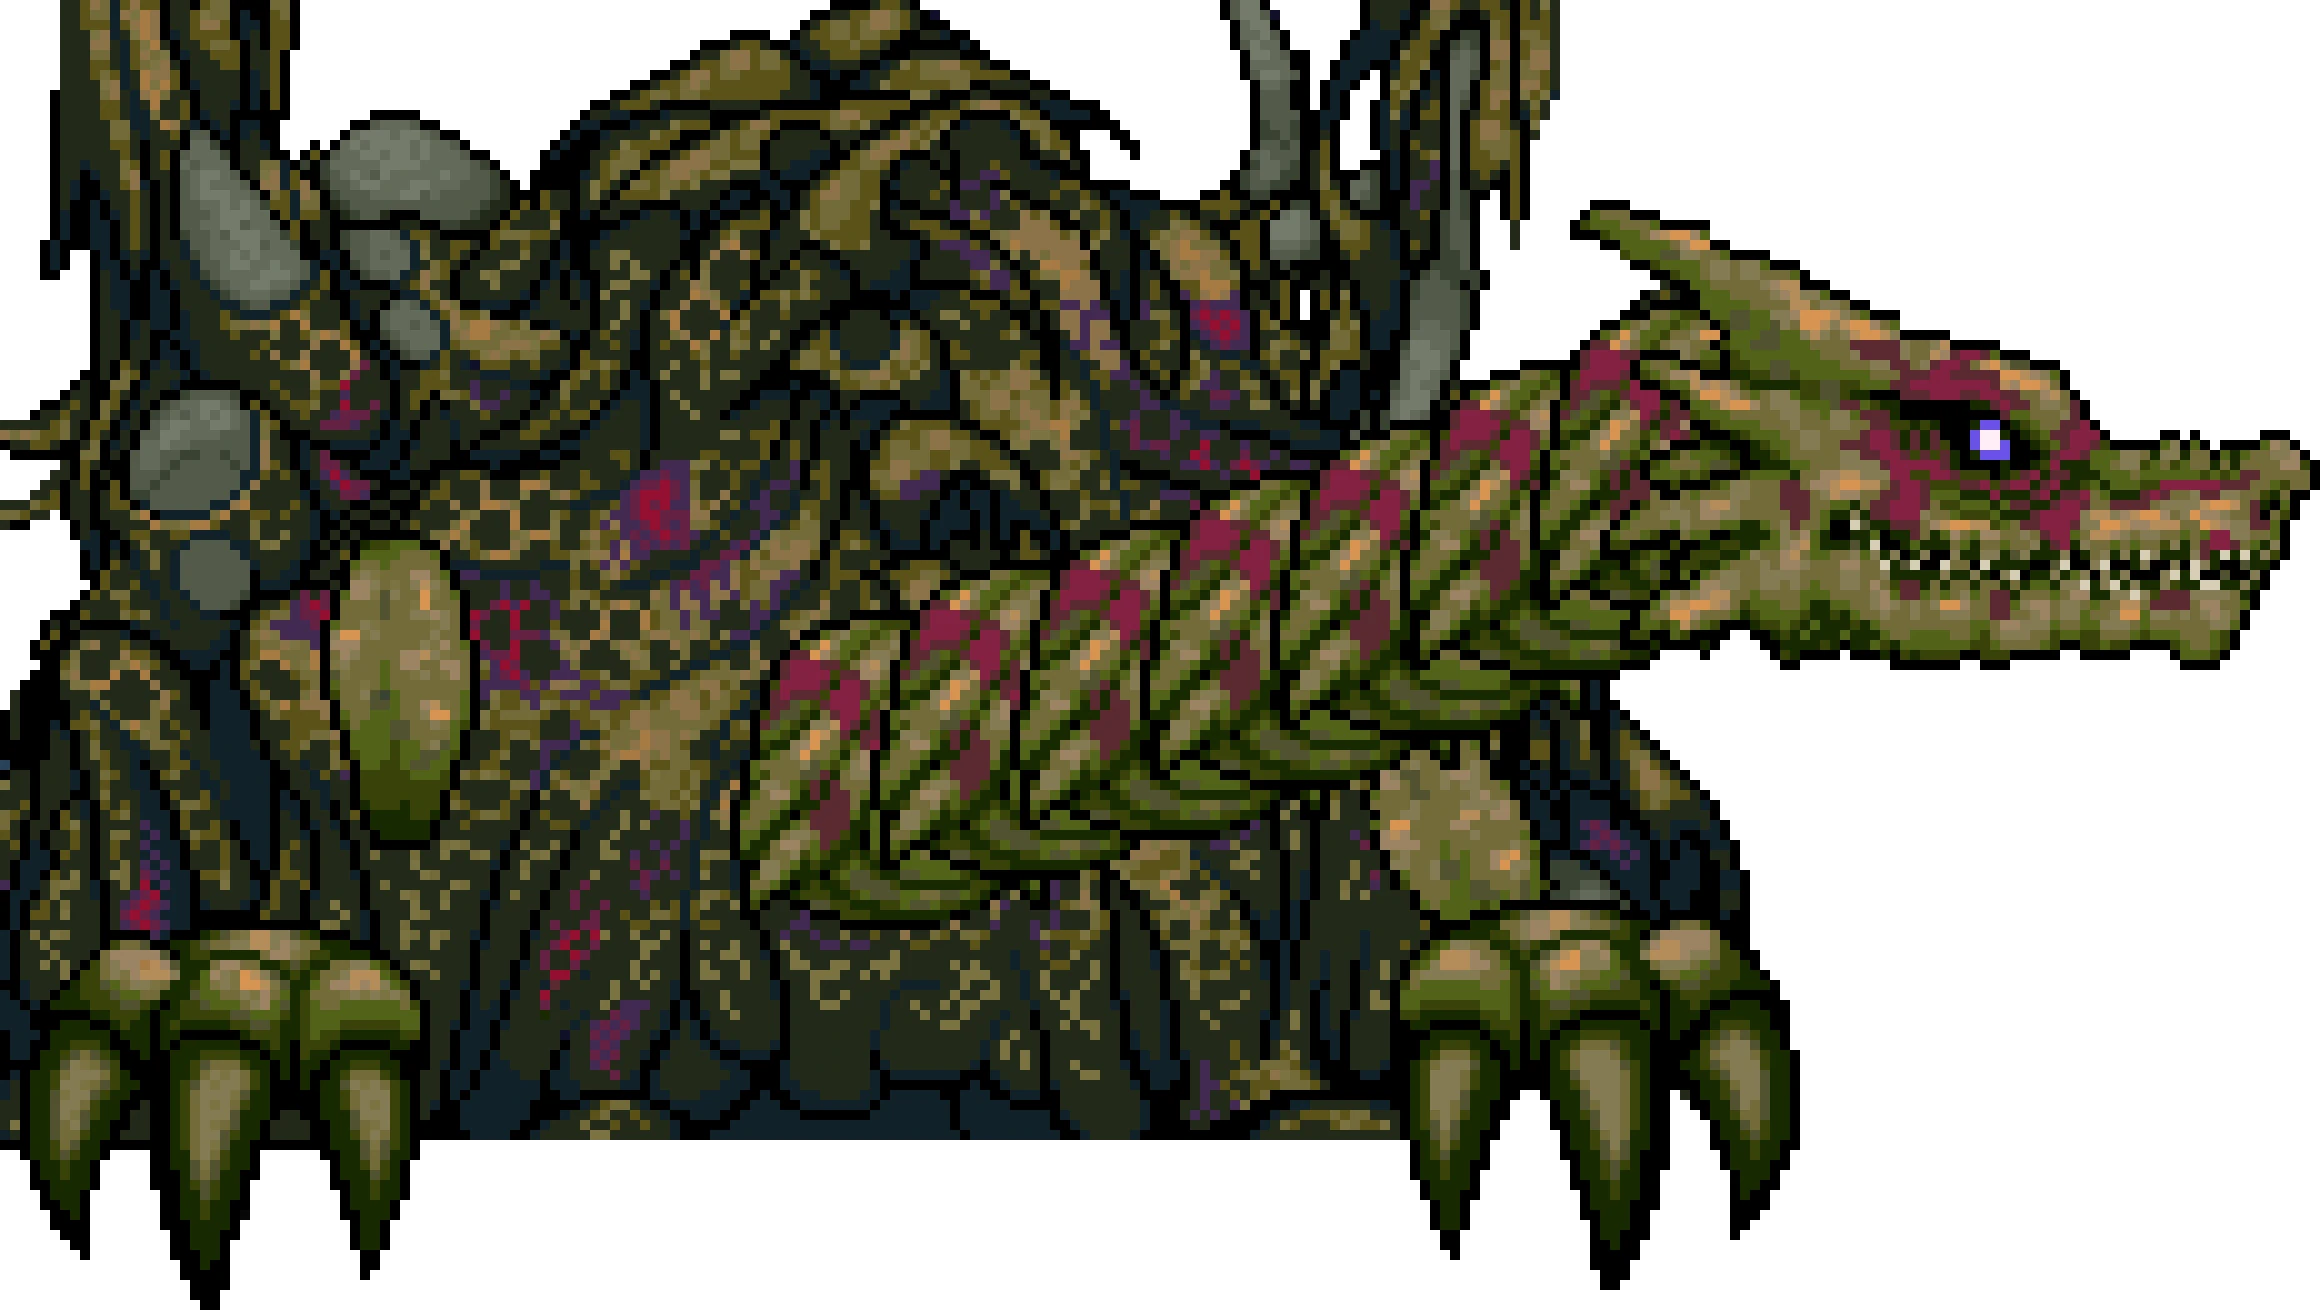
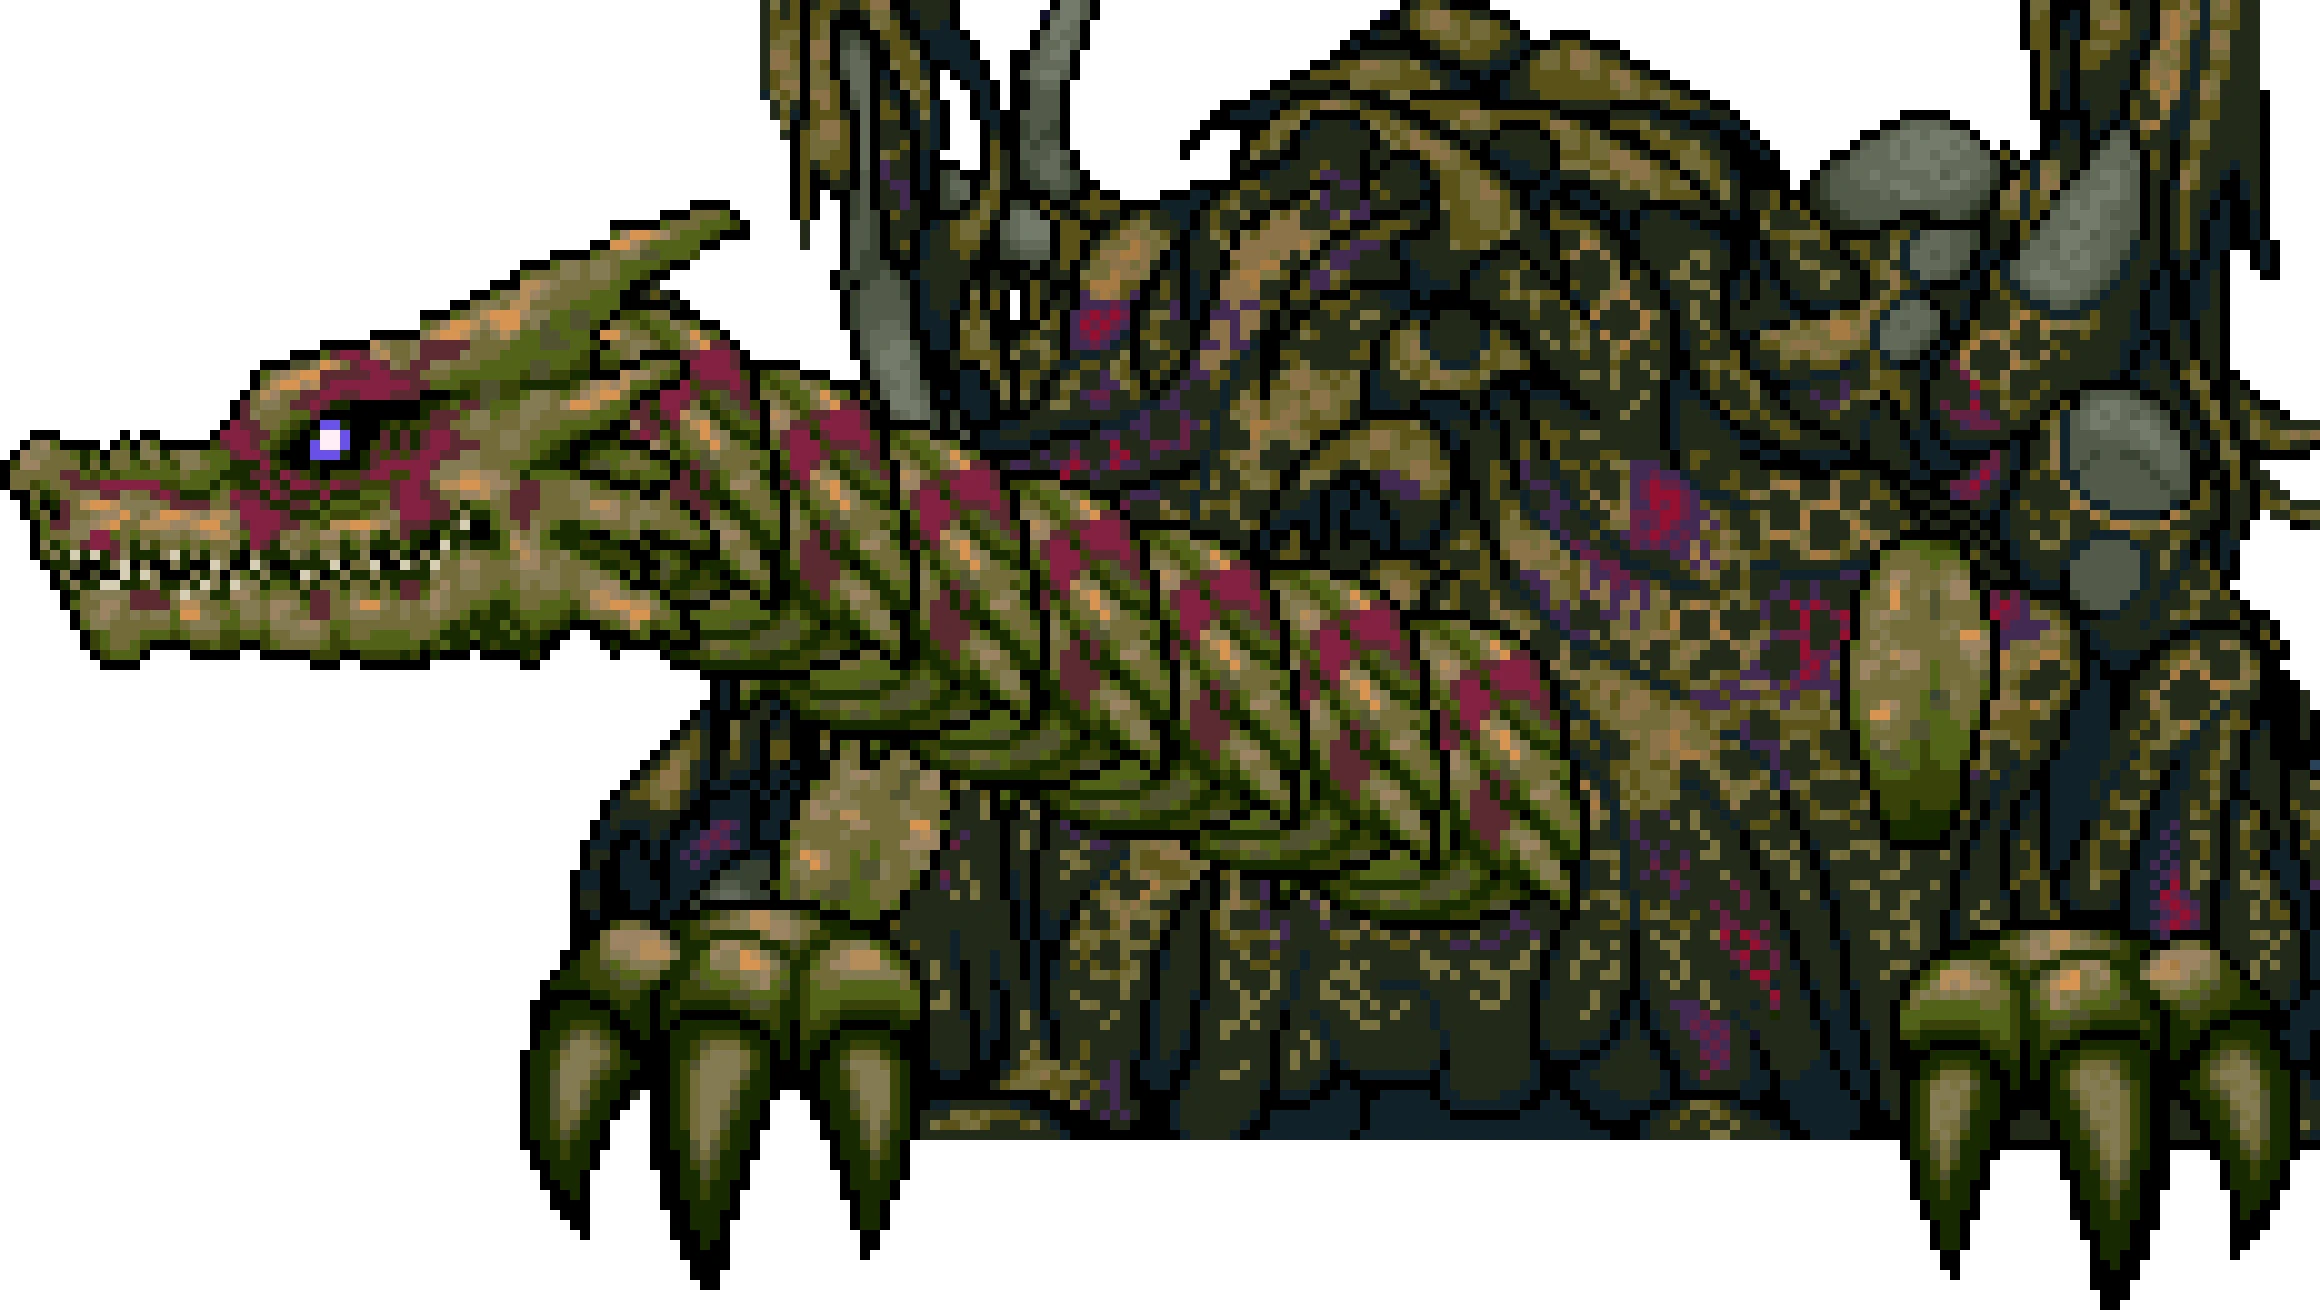
Castlevania: Circle of the Moon
Dragon Zombies appear as a pair of boss monsters. Both dragons lie on the floor, with their bodies in an advanced level of decay, and are so bulky they must resort to attack using only their heads. The left dragon attacks by spewing a series of loosely aimed fireballs, while the right dragon attacks with aimed balls of electricity. Both dragons have the ability to slam into the wall and cause debris to fall from the ceiling. When one dragon dies, the other will devour its companion's remains, regaining 300 HP in the process; however, doing so leaves it open for attack while feeding, allowing the player to probably deal even more damage than the health it regains. Once both are defeated, the Heavy Ring can be obtained from the next room.
|
Castlevania: Portrait of Ruin
In this game, the Dragon Zombie is not a boss but a large, uncommon enemy. It can bite, jump forward, wail its tail at the player, and more importantly, breath a large poisonous fume that covers a large area of the room. It usually appears in areas where an almost endless horde of Mummies spawn from the ground.
One can be encountered in the Buried Chamber, another in the Sandy Grave, and yet another one also makes an appearance in Boss Rush Mode (Course 1).
|
Item Data
| Item Data: Dragon Zombie | ||||||||
|---|---|---|---|---|---|---|---|---|
| Image | Name - Game Type - Users Description |
Attributes / Consume | Statistics / Sell | Found | Notes | |||

|
||||||||
| Restores the player's entire life gauge. | Consume: 20 Hearts |
Find: Stage 2 Create: Death Dragon soul |
||||||
| Certain boxes can be pushed. | Find: Underground Gallery Guard: Dragon Zombie |
Effect: Grants Nathan the ability to push certain wooden boxes. | ||||||
| A sword used in ancient Rome. | Attrib: Slash Consume: 50 MP (Critical Art) |
ATK +35, DEF +2 Sell: $1,450 |
Drop: Dragon Zombie, Hill Guard |
|||||
| A German two-handed sword. | Attrib: Slash Consume: 50 MP (Critical Art) |
ATK +69 Sell: $2,200 |
Rare Drop: Dragon Zombie |
|||||
Gallery
")
")
")
Trivia
- In Castlevania: Circle of the Moon, the right Dragon Zombie can be defeated even before the boss room's door has closed. As a result, by exploiting the Dual Set-Up System, Nathan can transform into a skeleton (Pluto + Black Dog) and start spamming bones. Since one hit with a big bone will likely kill the dragon and the fact that the right dragon will always be there every time Nathan enters the room, as long as the left dragon has not been killed, Nathan can gain big amounts of EXP quickly by repeating this process.
- In Castlevania: Lament of Innocence, in the first room of the Pagoda of the Misty Moon, the skeletal remains of a winged dragon appear on the floor.
- In Lords of Shadow, Gabriel Belmont fights a Titan boss near the end of the game called the Dracolich, which are the reanimated remains of a dead dragon. Interestingly enough, the original series' Dragon Zombie was said to have been slain by Dracula in his early years, while Gabriel defeated the Dracolich not long before he became Dracula himself.
")
")
")
See also
References
- Mr. P's Castlevania Realm
- Castlevania: Portrait of Ruin Bestiary by Darth Nemesis at GameFAQs.com
- Castlevania: Portrait of Ruin Walkthrough and FAQ by Zach "Darko" Long at GameFAQs.com
| Castlevania Legends |
|---|
| Characters |
| Sonia Belmont • Dracula • Alucard |
| Bosses |
| Creatures Bat • Death Dragon • Flying Wolf • Grim Reaper • Medusa • Jumping Demon • Executioner |
| Stages |
| Outside the Castle • Inside the Castle • The Clock Tower • The Top Floor of the Castle • The Cathedral Secret Passage |
| Music |
| Akumajō Dracula Best Music Collections BOX |
| Guides |
| Nintendo Power Guide • Futabasha Official Guide |
| Archives |
| Bestiary • Inventory • Castlevania: Resurrection |
| Castlevania: Circle of the Moon | |
|---|---|
| Characters | |
| Protagonist
Supporting cast Antagonists | |
| Bosses | |
|
Cerberus • Necromancer • Iron Golem • Adramelech • Dragon Zombie • Death | |
| Areas | |
|
Sealed Room • Catacomb • Abyss Stairway • Audience Room • Triumph Hallway • Outer Wall • Machine Tower • Eternal Corridor • Chapel Tower • Underground Gallery • Underground Warehouse • Underground Waterway • Observation Tower • Ceremonial Room • Battle Arena | |
| Music | |
|
Awake • Proof of Blood • Fate to Despair • Castlevania: Circle of the Moon and Castlevania: Harmony of Dissonance Original Soundtrack | |
| Guides | |
| Archives | |
|
Bestiary • Inventory • In-Game Formula • Magician Mode • Fighter Mode • Shooter Mode • Thief Mode | |