mNo edit summary |
mNo edit summary |
||
| (21 intermediate revisions by 5 users not shown) | |||
| Line 1: | Line 1: | ||
| ⚫ | |||
| − | {{Infobox |
+ | {{Infobox Enemy |
|name = Forgotten One |
|name = Forgotten One |
||
|image = FO-Face.png |
|image = FO-Face.png |
||
| Line 5: | Line 6: | ||
|jname = 忘れ去られし者<br />''Wasuresarareshi Mono'' |
|jname = 忘れ去られし者<br />''Wasuresarareshi Mono'' |
||
|aname = |
|aname = |
||
| + | |abil = |
||
| − | |abil = • Drops [[Curse]]-inflicting [[maggot]]s<br />• Gushes out [[poison]]ous blood<br />• Projects a powerful beam of energy from his mouth<br />• Causes boulders to fall<br />• Smashes, slams or sweeps with his hand |
||
| + | *Drops [[Curse]]-inflicting [[maggot]]s |
||
| + | *Gushes out [[poison]]ous blood |
||
| + | *Projects a powerful beam of energy from his mouth |
||
| + | *Causes boulders to fall |
||
| + | *Smashes, slams or sweeps with his hand |
||
|type = Man-made monster |
|type = Man-made monster |
||
|lore = Original ''[[Castlevania (series)|Castlevania]]'' lore |
|lore = Original ''[[Castlevania (series)|Castlevania]]'' lore |
||
| Line 15: | Line 21: | ||
|stuff2 = |
|stuff2 = |
||
}} |
}} |
||
| ⚫ | The {{nihongo|'''Forgotten One'''|忘れ去られし者|Wasuresarareshi Mono}} is an optional [[:category:Lament of Innocence Bosses|boss]] in ''[[Castlevania: Lament of Innocence]]''. He is a monster created by mortal hands and sealed in the [[Prison of Eternal Torture]] due to his uncontrollable power and to the fact that he nearly ended the world. In order to fight him, [[Leon Belmont|Leon]] has to first obtain the [[Jewel of Open|Unlock Jewel]] in the [[Pagoda of the Misty Moon]] and then go down the large staircase behind the mysterious door at the [[Castle Entrance (Lament of Innocence)|entrance]] of [[Walter Bernhard|Walter]]'s castle. |
||
| ⚫ | |||
| ⚫ | The {{ |
||
The Forgotten One is arguably the hardest boss in the game, as he has three stages of battle (organs, arm and head) with 4,800 [[Hit Points|HP]] each. When destroyed, he yields the [[Orb|Black Orb]]. |
The Forgotten One is arguably the hardest boss in the game, as he has three stages of battle (organs, arm and head) with 4,800 [[Hit Points|HP]] each. When destroyed, he yields the [[Orb|Black Orb]]. |
||
| Line 23: | Line 28: | ||
The Forgotten One is portrayed as the hanging torso of a gigantic creature completely stripped of skin, with all his insides, flesh and bone, exposed. His head fashions two ox-like horns and two tusks, giving him the appearance of a demon. |
The Forgotten One is portrayed as the hanging torso of a gigantic creature completely stripped of skin, with all his insides, flesh and bone, exposed. His head fashions two ox-like horns and two tusks, giving him the appearance of a demon. |
||
| − | He |
+ | He's bound by gigantic shackles, hooks and chains on many parts of his body, which retain him eternally suspended above the ground. An ancient mural found in the [[Pagoda of the Misty Moon]]'s west tower implies that this monster was subdued and put away since immemorial times, with generations and cultures coming and going on the surface world, while the creature remained imprisoned underground suffering his fate. |
Due to the level of putrescence his body has attained throughout the centuries, gigantic [[Maggot|maggots]] have grown inside of him, eternally feasting on his flesh. His blood has been [[Poison|tainted]] by the many years of decay and he may even inflict injuries on himself to use it as a means of attack. |
Due to the level of putrescence his body has attained throughout the centuries, gigantic [[Maggot|maggots]] have grown inside of him, eternally feasting on his flesh. His blood has been [[Poison|tainted]] by the many years of decay and he may even inflict injuries on himself to use it as a means of attack. |
||
| − | He |
+ | He's able to unleash a powerful roar from all the rage and hatred he has accumulated over the years, capable of shattering the very earth itself and causing rocks and debris to fall from above. His ultimate attack is a devastating energy beam that surges from his mouth, capable of destroying anything on its path. |
==Attacks== |
==Attacks== |
||
| Line 33: | Line 38: | ||
===Phase 1=== |
===Phase 1=== |
||
| − | *An endless supply of [[Maggot|maggots]] will drop off from the Forgotten One's body, landing on the platform where [[Leon Belmont|Leon]] stands. If he |
+ | *An endless supply of [[Maggot|maggots]] will drop off from the Forgotten One's body, landing on the platform where [[Leon Belmont|Leon]] stands. If he's close to them, they will arc back before lunging at him. They are capable of inflicting [[Curse]]. |
*A large gush of [[poison]]ous blood will start dripping from either the left, right, or middle parts of his organs. |
*A large gush of [[poison]]ous blood will start dripping from either the left, right, or middle parts of his organs. |
||
| Line 48: | Line 53: | ||
===Preparations=== |
===Preparations=== |
||
====Whip and Armor==== |
====Whip and Armor==== |
||
| − | *[[Whip of Ice]] - The Forgotten One is weak to [[Ice]], making the Whip of Ice even more effective than the [[Vampire Killer (whip)|Vampire Killer]]. |
+ | *[[Ice Whip|Whip of Ice]] - The Forgotten One is weak to [[Ice]], making the Whip of Ice even more effective than the [[Vampire Killer (whip)|Vampire Killer]]. |
*[[Sun Armor|Solar Plate]] - Reduces damage taken by 30%. |
*[[Sun Armor|Solar Plate]] - Reduces damage taken by 30%. |
||
====Items==== |
====Items==== |
||
| − | First of all, the player must rearrange their items list, putting their most useful ones at the top for easier access. They must also practice on how to consume an item quickly in the heat of battle by using the real-time window effectively. It |
+ | First of all, the player must rearrange their items list, putting their most useful ones at the top for easier access. They must also practice on how to consume an item quickly in the heat of battle by using the real-time window effectively. It's recommended to visit [[Rinaldo Gandolfi|Rinaldo]]'s [[shop]] prior to this fight and stock on all of the following items as much as possible: |
*[[Potion]] (×9) |
*[[Potion]] (×9) |
||
*[[High Potion]] (×9) |
*[[High Potion]] (×9) |
||
| Line 63: | Line 68: | ||
*[[Blessed Ring|Cleric's Ring]] - To raise the chance of not being [[curse]]d by the [[maggot]]s. |
*[[Blessed Ring|Cleric's Ring]] - To raise the chance of not being [[curse]]d by the [[maggot]]s. |
||
*[[Draupnir]] - To deal more damage. |
*[[Draupnir]] - To deal more damage. |
||
| + | *[[Assassin Necklace]] - While not as consistent as the Draupnir, the ability to score Critical Hits, especially when combined with a [[Raccoon Charm]], shouldn't be underestimated. |
||
*[[Death Doll|Sacrificial Doll]] - To avoid death one time and continue fighting. |
*[[Death Doll|Sacrificial Doll]] - To avoid death one time and continue fighting. |
||
| − | :<small>'''Note''': Equipping the [[Megingjord]] is not recommended for this fight as it |
+ | :<small>'''Note''': Equipping the [[Megingjord]] is not recommended for this fight as it's quite possible to take heavy damaging hits, which may kill Leon instantly if he's conserving little [[Hit Points|HP]] to benefit from this accessory's powers. The [[Blood Cloak|Bloody Cape]], [[Aroma Earring]], and [[Heart Brooch]] accessories are also not recommended, since [[Sub-Weapon|sub-weapons]] tend to inflict less damage than Leon's melee combos.</small> |
====Relics==== |
====Relics==== |
||
*[[Saisei Incense]] - To gradually recover [[Hit Points|HP]] throughout the fight until [[Mind Points|MP]] runs out. |
*[[Saisei Incense]] - To gradually recover [[Hit Points|HP]] throughout the fight until [[Mind Points|MP]] runs out. |
||
| + | *[[Black Bishop]] - A temporary boost to the player's [[Attack|ATK]] attribute can help somewhat with the last phase. |
||
| − | :<small>'''Note''': |
+ | :<small>'''Note''': Be warned that even if the player chooses to equip the [[Brisingamen]], relics are not very useful in this fight due to the fact that [[Perfect Guard]]ing the attacks employed by the Forgotten One or the maggots is a ''must'' if the player wishes to replenish [[Mind Points|MP]] without the aid of [[Mana Prism]]s.</small> |
===Phase 1=== |
===Phase 1=== |
||
| − | Leon must take the opportunity at the beginning of the fight to inflict as much damage as possible to the Forgotten One before the platform becomes crowded with [[maggot]]s. He will be able to score many more hits if he [[ |
+ | Leon must take the opportunity at the beginning of the fight to inflict as much damage as possible to the Forgotten One before the platform becomes crowded with [[maggot]]s. He will be able to score many more hits if he [[Double Jump|double jumps]] and keeps airborne as much as possible while unleashing combos at the organs. He must be careful when he returns to the ground, though, as a myriad of maggots will most likely have already converged to his position. Leon must then take a moment to clean the area quickly by killing as many maggots with as few whiplashes as possible, and also be ready to [[guard]] or [[Quick Step|step away]] if attacked by them, then perform another double jump and keep attacking the organs. The gush of [[poison]]ous blood is somewhat easy to avoid as it is telegraphed both visually and by the sound of the stream falling. |
If afflicted by any status ailment, the player must be quick in curing it as soon as possible. Overall, this phase focuses more about quick cleanup of the battlefield, effective item management and taking advantage of all opportunities to attack. |
If afflicted by any status ailment, the player must be quick in curing it as soon as possible. Overall, this phase focuses more about quick cleanup of the battlefield, effective item management and taking advantage of all opportunities to attack. |
||
===Phase 2=== |
===Phase 2=== |
||
| − | The main hindrance in this phase is the Forgotten One's hand, which will be pestering Leon constantly throughout the fight, although it |
+ | The main hindrance in this phase is the Forgotten One's hand, which will be pestering Leon constantly throughout the fight, although it's also his weak spot. Leon must try to keep away from the hand as much as possible and lure it into smashing or slamming onto the platform without sustaining damage himself, then quickly take the opportunity to attack it as much as possible. The smash (clenched fist) is easier to avoid, as it most likely will land near from where the hand is hovering. The slam is more difficult to avoid as it tends to land directly on Leon's current position, even if he's far away. Proper timing and quick reflexes, as well as effective usage of [[Quick Step|quick steps]], are required to avoid these attacks. |
| − | His hand-sweeping attack is not that difficult to avoid either, as he telegraphs this move with ample time. A simple [[ |
+ | His hand-sweeping attack is not that difficult to avoid either, as he telegraphs this move with ample time. A simple [[Double Jump|double jump]] with the correct timing will make this attack to miss. |
When he clenches his fist and starts sprouting [[poison]]ous blood, Leon must keep on the move and avoid the puddles left on the platform, searching for a good spot to attack the foe at the same time. |
When he clenches his fist and starts sprouting [[poison]]ous blood, Leon must keep on the move and avoid the puddles left on the platform, searching for a good spot to attack the foe at the same time. |
||
| Line 97: | Line 104: | ||
==Enemy Data== |
==Enemy Data== |
||
{{Enemy Stats/Lament of Innocence |
{{Enemy Stats/Lament of Innocence |
||
| − | |Image = [[File:Forgottenone.png| |
+ | |Image = [[File:Forgottenone.png|200px]] |
|No. = 79 |
|No. = 79 |
||
|Name = Forgotten One |
|Name = Forgotten One |
||
|JPN = 忘れ去られし者 ''Wasuresarareshi Mono'' |
|JPN = 忘れ去られし者 ''Wasuresarareshi Mono'' |
||
| − | |HP = 4,800 ( |
+ | |HP = 4,800 (×3) |
| − | | |
+ | |Strong = [[Fire]], [[Thunder]], [[Cross]] |
| − | | |
+ | |Weak = [[Ice]] |
| ⚫ | |||
|Drop = [[Orb|Black Orb]] |
|Drop = [[Orb|Black Orb]] |
||
| ⚫ | |||
|Description = A man-made monster, eternally sealed away due to an enormous uncontrollable power. |
|Description = A man-made monster, eternally sealed away due to an enormous uncontrollable power. |
||
}} |
}} |
||
| Line 115: | Line 122: | ||
==Notes== |
==Notes== |
||
| − | *The Forgotten One is weak against [[Ice]], making the [[Whip of Ice]] more effective against him than the [[Vampire Killer (whip)|Vampire Killer]]. |
+ | *The Forgotten One is weak against [[Ice]], making the [[Ice Whip|Whip of Ice]] more effective against him than the [[Vampire Killer (whip)|Vampire Killer]]. |
==Gallery== |
==Gallery== |
||
| − | <gallery |
+ | <gallery type="slideshow" position="center" crop="true"> |
| − | Lament of Innocence - |
+ | Lament of Innocence - Pagoda of the Misty Moon - 02.png|An ancient mural found in the [[Pagoda of the Misty Moon]]'s west tower depicting the Forgotten One |
| + | Forgotten One Mural-edit.jpg|Close up |
||
| − | Lament of Innocence - Pagoda of the Misty Moon - 02.png|An ancient mural depicting the '''Forgotten One''' found in the [[Pagoda of the Misty Moon]]'s west tower |
||
| + | Forgotten one phase1.1.jpg|Phase 1 |
||
| + | img6.jpg|Phase 1 (exhibited heart) |
||
| + | img10.jpg|Phase 2 |
||
| + | img11.jpg|Phase 2 (blood rain) |
||
| + | img17.jpg|Phase 3 |
||
| + | img27.jpg|Phase 3 (beam) |
||
| + | img29.jpg|Dead |
||
</gallery> |
</gallery> |
||
| Line 129: | Line 143: | ||
*The Forgotten One is considered to be one of the most disturbing bosses in the ''[[Castlevania (series)|Castlevania]]'' series. |
*The Forgotten One is considered to be one of the most disturbing bosses in the ''[[Castlevania (series)|Castlevania]]'' series. |
||
*The Forgotten One is similar to [[Beelzebub]] in that they are both giant enemies with decomposing flesh, retained with chains and shackles above the ground, and both must be butchered limb-by-limb and organ-by-organ in what ends up being a very gory battle. |
*The Forgotten One is similar to [[Beelzebub]] in that they are both giant enemies with decomposing flesh, retained with chains and shackles above the ground, and both must be butchered limb-by-limb and organ-by-organ in what ends up being a very gory battle. |
||
| − | *The description of the [[maggot]]s that crawl out of the Forgotten One's body in the US version reads "a maggot that devours Forgotten Ones", which could imply there are more of these monsters in existence. However, the original description in the Japanese version reads: "maggots that devour the Forgotten One" (忘れ去られし者を食い荒らすウジ). This might have been either a mistranslation or a liberty taken by the localization team |
+ | *The description of the [[maggot]]s that crawl out of the Forgotten One's body in the US version reads "a maggot that devours Forgotten Ones", which could imply there are more of these monsters in existence. However, the original description in the Japanese version reads: "maggots that devour the Forgotten One" (忘れ去られし者を食い荒らすウジ). This might have been either a mistranslation or a liberty taken by the localization team. |
*The Forgotten One is [[Koji Igarashi]]'s most memorable boss, in part because of how shocked the fans were, as well as the fact that his appearance bumped ''[[Castlevania: Lament of Innocence|Lament of Innocence]]'''s rating to mature. His favorite boss gameplay-wise is [[Abaddon]]. |
*The Forgotten One is [[Koji Igarashi]]'s most memorable boss, in part because of how shocked the fans were, as well as the fact that his appearance bumped ''[[Castlevania: Lament of Innocence|Lament of Innocence]]'''s rating to mature. His favorite boss gameplay-wise is [[Abaddon]]. |
||
{{LOI}} |
{{LOI}} |
||
| + | |||
| + | [[es:Olvidado]] |
||
| + | [[Category:Original Castlevania lore]] |
||
[[Category:Lament of Innocence Bosses]] |
[[Category:Lament of Innocence Bosses]] |
||
Revision as of 14:22, 12 April 2020
- For the Lords of Shadow antagonist, see Forgotten One (Lords of Shadow).
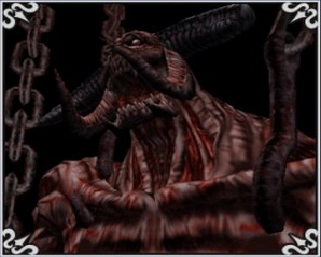
The Forgotten One (忘れ去られし者 Wasuresarareshi Mono?) is an optional boss in Castlevania: Lament of Innocence. He is a monster created by mortal hands and sealed in the Prison of Eternal Torture due to his uncontrollable power and to the fact that he nearly ended the world. In order to fight him, Leon has to first obtain the Unlock Jewel in the Pagoda of the Misty Moon and then go down the large staircase behind the mysterious door at the entrance of Walter's castle.
The Forgotten One is arguably the hardest boss in the game, as he has three stages of battle (organs, arm and head) with 4,800 HP each. When destroyed, he yields the Black Orb.
Description
The Forgotten One is portrayed as the hanging torso of a gigantic creature completely stripped of skin, with all his insides, flesh and bone, exposed. His head fashions two ox-like horns and two tusks, giving him the appearance of a demon.
He's bound by gigantic shackles, hooks and chains on many parts of his body, which retain him eternally suspended above the ground. An ancient mural found in the Pagoda of the Misty Moon's west tower implies that this monster was subdued and put away since immemorial times, with generations and cultures coming and going on the surface world, while the creature remained imprisoned underground suffering his fate.
Due to the level of putrescence his body has attained throughout the centuries, gigantic maggots have grown inside of him, eternally feasting on his flesh. His blood has been tainted by the many years of decay and he may even inflict injuries on himself to use it as a means of attack.
He's able to unleash a powerful roar from all the rage and hatred he has accumulated over the years, capable of shattering the very earth itself and causing rocks and debris to fall from above. His ultimate attack is a devastating energy beam that surges from his mouth, capable of destroying anything on its path.
Attacks
The Forgotten One's first stage is his lower torso and organs. Leon has to attack these in order to tear them off one by one.
Phase 1
- An endless supply of maggots will drop off from the Forgotten One's body, landing on the platform where Leon stands. If he's close to them, they will arc back before lunging at him. They are capable of inflicting Curse.
- A large gush of poisonous blood will start dripping from either the left, right, or middle parts of his organs.
Phase 2
- He sweeps his hand across the platform, dealing heavy damage. On Hard Mode, he will sweep his arm three times.
- He starts hovering his hand above the platform and then slams it down. Alternatively, he will smash his fist down.
- He clenches his fist with great force, provoking a wound on himself that drips poisonous blood, and then he continues to spray it all across the platform. After he finishes releasing the blood, he will slam his hand down again.
Phase 3
- He unleashes a powerful roar that shakes the room, causing rocks to crash down from above. Some bigger rocks will remain on the platform while the smaller ones will disappear.
- He sweeps a devastating energy beam from his mouth across the stage. The rocks are the only shelter from this attack. Being hit by this attack generally results in instant death.
Strategy
Preparations
Whip and Armor
- Whip of Ice - The Forgotten One is weak to Ice, making the Whip of Ice even more effective than the Vampire Killer.
- Solar Plate - Reduces damage taken by 30%.
Items
First of all, the player must rearrange their items list, putting their most useful ones at the top for easier access. They must also practice on how to consume an item quickly in the heat of battle by using the real-time window effectively. It's recommended to visit Rinaldo's shop prior to this fight and stock on all of the following items as much as possible:
- Potion (×9)
- High Potion (×9)
- Serum (×9) - To cure Poison status inflicted by the Forgotten One's blood.
- Uncurse Potion (×9) - To cure Curse status inflicted by the maggots.
Accessories
The player must make sure they have obtained the Tool Bag in the Garden Forgotten by Time to allow Leon to equip three accessories at once. Recommended accessories are:
- Anti-poison Ring - To raise the chance of not being poisoned by the Forgotten One's blood.
- Cleric's Ring - To raise the chance of not being cursed by the maggots.
- Draupnir - To deal more damage.
- Assassin Necklace - While not as consistent as the Draupnir, the ability to score Critical Hits, especially when combined with a Raccoon Charm, shouldn't be underestimated.
- Sacrificial Doll - To avoid death one time and continue fighting.
- Note: Equipping the Megingjord is not recommended for this fight as it's quite possible to take heavy damaging hits, which may kill Leon instantly if he's conserving little HP to benefit from this accessory's powers. The Bloody Cape, Aroma Earring, and Heart Brooch accessories are also not recommended, since sub-weapons tend to inflict less damage than Leon's melee combos.
Relics
- Saisei Incense - To gradually recover HP throughout the fight until MP runs out.
- Black Bishop - A temporary boost to the player's ATK attribute can help somewhat with the last phase.
- Note: Be warned that even if the player chooses to equip the Brisingamen, relics are not very useful in this fight due to the fact that Perfect Guarding the attacks employed by the Forgotten One or the maggots is a must if the player wishes to replenish MP without the aid of Mana Prisms.
Phase 1
Leon must take the opportunity at the beginning of the fight to inflict as much damage as possible to the Forgotten One before the platform becomes crowded with maggots. He will be able to score many more hits if he double jumps and keeps airborne as much as possible while unleashing combos at the organs. He must be careful when he returns to the ground, though, as a myriad of maggots will most likely have already converged to his position. Leon must then take a moment to clean the area quickly by killing as many maggots with as few whiplashes as possible, and also be ready to guard or step away if attacked by them, then perform another double jump and keep attacking the organs. The gush of poisonous blood is somewhat easy to avoid as it is telegraphed both visually and by the sound of the stream falling.
If afflicted by any status ailment, the player must be quick in curing it as soon as possible. Overall, this phase focuses more about quick cleanup of the battlefield, effective item management and taking advantage of all opportunities to attack.
Phase 2
The main hindrance in this phase is the Forgotten One's hand, which will be pestering Leon constantly throughout the fight, although it's also his weak spot. Leon must try to keep away from the hand as much as possible and lure it into smashing or slamming onto the platform without sustaining damage himself, then quickly take the opportunity to attack it as much as possible. The smash (clenched fist) is easier to avoid, as it most likely will land near from where the hand is hovering. The slam is more difficult to avoid as it tends to land directly on Leon's current position, even if he's far away. Proper timing and quick reflexes, as well as effective usage of quick steps, are required to avoid these attacks.
His hand-sweeping attack is not that difficult to avoid either, as he telegraphs this move with ample time. A simple double jump with the correct timing will make this attack to miss.
When he clenches his fist and starts sprouting poisonous blood, Leon must keep on the move and avoid the puddles left on the platform, searching for a good spot to attack the foe at the same time.
Phase 3
The third phase is not very difficult, although a single attack may be enough to kill Leon. This phase comprises only two attacks:
- The Forgotten One performs a great roar that makes boulders fall from above.
- The Forgotten One unleashes a very powerful energy beam from his mouth, spraying it all across the platform.
Some giant rock formations will fall and remain on the field in his first attack, these are key to survive his energy beam as Leon can take cover behind them to avoid damage.
When the rocks start falling, Leon must move away from the Forgotten One (toward the screen) as all debris will fall near the frontal part of the platform, dealing medium to heavy damage. The Forgotten One will most likely follow by unleashing the energy beam next. At this moment, Leon must make his priority to take shelter behind one of the rocks left from the first attack. This sequence will continue throughout the rest of the fight. Special care must be taken of never trying to hide behind a cracked rock, as it will undoubtedly shatter when hit by the next energy beam, causing Leon to take full damage.
Most of the times there will always be a rock where to hide behind; however, there may be some instances where there will be no rocks left or the ones remaining will be already cracked, making this the main reason why the player must hurry in ending the fight as quickly as possible.
Enemy Data
|
Item Data
| Item Data: Forgotten One | ||||||||
|---|---|---|---|---|---|---|---|---|
| Image | Name - Game Type - Users Description |
Attributes / Consume | Statistics / Sell | Found | Notes | |||
|
||||||||
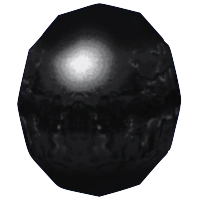
| Magical Orb: Glows Black. | Drop: Forgotten One |
Special: Blade Serpent (Knife), Rapid Slash (Axe), Energy Wave (Holy Water), Six Saints (Cross), Vanishing Storm (Crystal), Pumpkin Serpent (Pumpkin) | ||||||
Notes
- The Forgotten One is weak against Ice, making the Whip of Ice more effective against him than the Vampire Killer.
Gallery


Trivia
- The Forgotten One has the second highest HP amount of any enemy in the Castlevania series, with a total of 14,400 HP. The only one that exceeds it is Legion/Nuculais from Curse of Darkness, with a total of 15,775 HP.
- The Unlock Jewel (the key to the Prison of Eternal Torture) is hidden away in its very own tower on the west wing of the Pagoda of the Misty Moon's second floor, guarded by Walter's most powerful monsters and near his own throne room. In addition, the room where the Unlock Jewel is held in is a pitch black, bottomless room, with an ancient mural on a wall showcasing the Forgotten One as a warning to everyone who dares face him.
- The Forgotten One is conformed only by his torso, head and left arm. According to this mural, the right arm, as well as his lower limbs, were torn off from his body when he was imprisoned.
- The Forgotten One is considered to be one of the most disturbing bosses in the Castlevania series.
- The Forgotten One is similar to Beelzebub in that they are both giant enemies with decomposing flesh, retained with chains and shackles above the ground, and both must be butchered limb-by-limb and organ-by-organ in what ends up being a very gory battle.
- The description of the maggots that crawl out of the Forgotten One's body in the US version reads "a maggot that devours Forgotten Ones", which could imply there are more of these monsters in existence. However, the original description in the Japanese version reads: "maggots that devour the Forgotten One" (忘れ去られし者を食い荒らすウジ). This might have been either a mistranslation or a liberty taken by the localization team.
- The Forgotten One is Koji Igarashi's most memorable boss, in part because of how shocked the fans were, as well as the fact that his appearance bumped Lament of Innocence's rating to mature. His favorite boss gameplay-wise is Abaddon.
| Castlevania: Lament of Innocence |
|---|
| Characters |
| Protagonist |
| Leon Belmont |
| Supporting cast |
| Sara Trantoul • Rinaldo Gandolfi • Mathias Cronqvist |
| Antagonists |
| Joachim Armster • Walter Bernhard • Death |
| Lesser roles |
| Elisabetha Cronqvist • Pumpkin |
| Bosses |
| Main bosses |
| Undead Parasite • Golem • Succubus • Medusa • Joachim • Walter • Death |
| Minor/optional bosses |
| Flame Elemental • Frost Elemental • Thunder Elemental • Doppelganger • Forgotten One |
| Areas |
| Forest of Eternal Night • Castle Entrance • House of Sacred Remains • Anti-Soul Mysteries Lab • Ghostly Theatre • Dark Palace of Waterfalls Garden Forgotten by Time • Pagoda of the Misty Moon • Prison of Eternal Torture |
| Music |
| Castlevania: Lament of Innocence Original Soundtrack |
| Guides |
| Futabasha Guide • NTT Pub Guide • Shinkigensha Guide • BradyGames Guide |
| Archives |
| Bestiary • Inventory • Joachim Mode • Pumpkin Mode |