m (Added theme name) |
mNo edit summary |
||
| (44 intermediate revisions by 11 users not shown) | |||
| Line 1: | Line 1: | ||
| + | {{for|the general [[Environments|environment]]|Outer Walls}} |
||
| − | ''This article is for the stage in [[Castlevania: Symphony of the Night]] and [[Castlevania Puzzle: Encore of the Night]]. For other stages in other games, please see [[Outer Wall]].'' |
||
| + | {{Infobox Location |
||
| + | |name = Outer Wall |
||
| + | |jname = 崖側外壁 ''Gakegawa Gaiheki'' |
||
| + | |game = [[Castlevania: Symphony of the Night]] |
||
| + | |image = Nitm area 04.png |
||
| + | |caption = |
||
| + | |enemy = [[Outer Wall (Symphony of the Night)#Enemy Data|Enemy Data]] |
||
| + | |boss = [[Doppelganger|Doppelganger10]] |
||
| + | |dialogue = |
||
| + | |env = [[Outer Walls|Outer wall]] |
||
| ⚫ | |||
| + | |previous = [[Marble Gallery]] |
||
| + | |next = [[Long Library]] |
||
| + | |gallery = |
||
| + | }} |
||
| ⚫ | The {{nihongo|'''Outer Wall'''|崖側外壁|Gakegawa Gaiheki}} is a large, vertical structure off to the far right side of [[Dracula's Castle]]. A very unsettling elevator can be accessed here for faster transportation, as long as it is activated properly. At the very bottom, a room contains a telescope which [[Alucard]] can peer through to view the outside lake. The weather shifts here, too; sometimes it is foggy, sometimes it is raining, and sometimes it is a clear, moonlit sky. The weather effects are not present on the [[Castlevania: Symphony of the Night/Saturn|Saturn version]]. |
||
| ⚫ | |||
| ⚫ | |||
| ⚫ | The '''Outer Wall''' is the fourth stage in ''[[Castlevania: Symphony of the Night]]''. It is first reached from the [[Marble Gallery]]. It leads to the next stage, the [[Long Library]]. It also leads to the [[Clock Tower (Symphony of the Night)|Clock Tower]]. However, you will not be able to get very far into the Clock Tower until you have the [[Double Jump]] ability that the [[Leap Stone]] gives you, which is obtained from the [[Castle Keep]]. This stage's counterpart in the [[Reverse Castle]] is the [[Reverse Outer Wall]]. |
||
| + | A secret room is present in the lower part of the area which would normally require entry through a grating using the [[Form of Mist]], but can be entered far earlier. The upper entry is guarded by an extremely powerful [[Armor Lord]], but Alucard can use [[Hellfire]] to teleport past him or [[Soul Steal]] or [[Summon Spirit]] / [[Tetra Spirit]] to kill him from the platform below. |
||
| ⚫ | |||
| + | This leaves Alucard in what appears to be a dead-end room, but the wall to the left can be destroyed. Standing in the alcove this creates for roughly 20 seconds will trigger a secret elevator which takes Alucard into the room below, which contains the powerful [[Jewel Knuckles]] and the extremely useful [[stone]]-resistant [[Mirror Cuirass]]. Using the elevator again allows Alucard to exit. Interestingly, the Armor Lord does not respawn. |
||
| ⚫ | |||
| + | |||
| ⚫ | The Outer Wall is the fourth stage in [[Castlevania: Symphony of the Night]]. It is first reached from the [[Marble Gallery]]. It leads to the next stage, the [[Long Library]]. It also leads to the [[Clock Tower]]. However, you will not be able to get very far into the Clock Tower until you have the [[Double Jump]] ability that the [[Leap Stone]] gives you, which is obtained from the [[Castle Keep]]. This stage's counterpart in the [[ |
||
| + | At the very bottom of the Outer Wall, a usable telescope can be found. This will show a view of a nearby lake, where the Ferryman can be seen. |
||
===Enemy Data=== |
===Enemy Data=== |
||
| Line 24: | Line 42: | ||
{{Enemy Table End}} |
{{Enemy Table End}} |
||
| + | ===Item Data=== |
||
| ⚫ | |||
| − | + | {{Local Item Data|[[Outer Wall (Symphony of the Night)|Outer Wall]]}} |
|
| + | {{Item Table Begin|Outer Wall}} |
||
| + | {{Symphony of the Night Item Data/Accessories|Zircon|find=[[Outer Wall (Symphony of the Night)|Outer Wall]]}} |
||
| + | {{Symphony of the Night Item Data/Food|Pot Roast|find=[[Outer Wall (Symphony of the Night)|Outer Wall]] (hidden)|find_detail=In breakable wall in room past the Armor Lord below the Marble Gallery.}} |
||
| + | {{Symphony of the Night Item Data/Fist|Jewel Knuckles|find=[[Outer Wall (Symphony of the Night)|Outer Wall]] (secret)|find_detail=Normally requires Mist Form. Can obtain early by standing on an unseen elevator in the wall where the Pot Roast was found.}} |
||
| + | {{Symphony of the Night Item Data/Body|Mirror Cuirass|find=[[Outer Wall (Symphony of the Night)|Outer Wall]] (secret)|find_detail=Found in same room as Jewel Knuckles.}} |
||
| + | {{Symphony of the Night Item Data/Sub-Weapons|Knife|find=[[Outer Wall (Symphony of the Night)|Outer Wall]]|find_details = Below the Armor Lord.}} |
||
| + | {{Symphony of the Night Item Data/Items|Life Vessel|find=[[Outer Wall (Symphony of the Night)|Outer Wall]] (reward)|find_details=Appears after defeating Doppelganger.}} |
||
| + | {{Symphony of the Night Item Data/Swords|Gladius}} |
||
| + | {{Symphony of the Night Item Data/Items|Life Vessel|find=[[Outer Wall (Symphony of the Night)|Outer Wall]]|find_details=Beyond a difficult jump below the elevator. Near a mouse.}} |
||
| + | {{Symphony of the Night Item Data/Items|Heart Vessel|find=[[Outer Wall (Symphony of the Night)|Outer Wall]]|find_details=Beyond a difficult jump near the elevator activation switch.}} |
||
| + | {{Symphony of the Night Item Data/Sub-Weapons|Bible|find=[[Outer Wall (Symphony of the Night)|Outer Wall]]|find_details=At top of tower.}} |
||
| + | {{Symphony of the Night Item Data/Relics|Soul of Wolf|find=[[Outer Wall (Symphony of the Night)|Outer Wall]] (inaccessible at first)|find_details=Accessible once elevator is activated from switch just a little above the elevator.}} |
||
| + | {{Symphony of the Night Item Data/Accessories|Garnet|find=[[Outer Wall (Symphony of the Night)|Outer Wall]] (requires [[Leap Stone]])|find_details=Just above entrance from Marble Gallery.}} |
||
| + | {{Item Table End}} |
||
| + | |||
| + | ===Gallery=== |
||
| + | <gallery type="slideshow" position="center"> |
||
| + | Nitm area 04.png |
||
| + | Castlevania Symphony of the Night - Outer Wall.png |
||
| + | Castlevania Symphony of the Night - Outer Wall Map.png |
||
| + | Outer_wall1.png |
||
| + | Outer_wall2.png |
||
| + | Outer_wall3.png |
||
| + | </gallery> |
||
| + | |||
| + | ===Related Stages=== |
||
| + | *[[Marble Gallery]] - Previous stage for Alucard |
||
| + | *[[Long Library]] - Next stage for Alucard |
||
| + | *[[Entrance (Symphony of the Night)|Entrance]] - Accessible from Teleporter, initially accessed from Outer Wall. Other areas later also accessible at Teleporter when the other Teleporters found. |
||
| + | *[[Clock Tower (Symphony of the Night)|Clock Tower]] - Connected area. Initially accessible to a point. Leap Stone is required to get further into it. |
||
| + | |||
| ⚫ | |||
| + | The Outer Wall in ''[[Castlevania Puzzle: Encore of the Night]]'' includes some enemies from the original Outer Wall. |
||
{{Enemy Table Begin|Castlevania Puzzle: Encore of the Night}} |
{{Enemy Table Begin|Castlevania Puzzle: Encore of the Night}} |
||
{{Encore of the Night Enemy Data|Medusa Head}} |
{{Encore of the Night Enemy Data|Medusa Head}} |
||
| Line 33: | Line 84: | ||
{{Encore of the Night Enemy Data|Doppleganger}} |
{{Encore of the Night Enemy Data|Doppleganger}} |
||
{{Enemy Table End}} |
{{Enemy Table End}} |
||
| + | |||
| + | {{SON}} |
||
[[Category:Outer Walls]] |
[[Category:Outer Walls]] |
||
| − | [[Category: |
+ | [[Category:Dracula X Chronicles Locations]] |
| ⚫ | |||
[[Category:Encore of the Night Locations]] |
[[Category:Encore of the Night Locations]] |
||
| ⚫ | |||
Revision as of 17:41, 25 February 2020
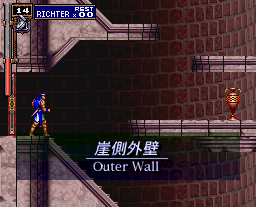
- For the general environment, see Outer Walls.
The Outer Wall (崖側外壁 Gakegawa Gaiheki?) is a large, vertical structure off to the far right side of Dracula's Castle. A very unsettling elevator can be accessed here for faster transportation, as long as it is activated properly. At the very bottom, a room contains a telescope which Alucard can peer through to view the outside lake. The weather shifts here, too; sometimes it is foggy, sometimes it is raining, and sometimes it is a clear, moonlit sky. The weather effects are not present on the Saturn version.
Geography
The Outer Wall is the fourth stage in Castlevania: Symphony of the Night. It is first reached from the Marble Gallery. It leads to the next stage, the Long Library. It also leads to the Clock Tower. However, you will not be able to get very far into the Clock Tower until you have the Double Jump ability that the Leap Stone gives you, which is obtained from the Castle Keep. This stage's counterpart in the Reverse Castle is the Reverse Outer Wall.
A secret room is present in the lower part of the area which would normally require entry through a grating using the Form of Mist, but can be entered far earlier. The upper entry is guarded by an extremely powerful Armor Lord, but Alucard can use Hellfire to teleport past him or Soul Steal or Summon Spirit / Tetra Spirit to kill him from the platform below.
This leaves Alucard in what appears to be a dead-end room, but the wall to the left can be destroyed. Standing in the alcove this creates for roughly 20 seconds will trigger a secret elevator which takes Alucard into the room below, which contains the powerful Jewel Knuckles and the extremely useful stone-resistant Mirror Cuirass. Using the elevator again allows Alucard to exit. Interestingly, the Armor Lord does not respawn.
At the very bottom of the Outer Wall, a usable telescope can be found. This will show a view of a nearby lake, where the Ferryman can be seen.
Enemy Data
| Enemy Data: Outer Wall | |||||
|---|---|---|---|---|---|
| Image | Name - Game Description |
Statistics | Items | Location | Notes |
| From Medusa's hair. | Strong: Stone (immune) Level: 7 HP: 12 Exp: 20 |
Drop: Resist Stone, Medusa Shield |
Black Marble Gallery, Clock Tower, Death Wing's Lair, Outer Wall |
||
| From Medusa's hair. Can petrify. | Strong: Stone (absorb) Level: 8 HP: 12 Exp: 30 |
Drop: Resist Stone, Medusa Shield |
Black Marble Gallery, Clock Tower, Death Wing's Lair, Reverse Clock Tower, Outer Wall |
||
| Heavily armored undead warrior. | Strong: Cut Level: 12 HP: 81 Exp: 100 |
Drop: Rapier, Saber |
Colosseum, Outer Wall |
||
| Well armored axe knight. | Weak: Hit (DXC only) Level: 9 HP: 42 Exp: 50 |
Drop: Axe, AxeLord Shield |
Castle Keep, Colosseum, Outer Wall |
Weapons: Axe, Axe Knight Shield | |
| Magically animated skeleton. | Weak: Holy Level: 2 HP: 9 Exp: 10 |
Drop: Shield Potion, Monster Vial 3 |
Alchemy Laboratory, Floating Catacombs, Marble Gallery, Outer Wall |
Abil: Bone Throw (high arc) | |
| Animated ape skeleton. Hurls wooden barrels. | Weak: Holy Level: 10 HP: 10 Exp: 30 |
Drop: Banana, TNT |
Outer Wall, Underground Caverns |
||
| Armored warrior with naginata. | Weak: Holy Level: 10 HP: 20 Exp: 70 |
Drop: Javelin, Iron Cuirass |
Outer Wall, Underground Caverns, Cursed Prison (Saturn only) |
||
| Skeleton archer equipped with bow. | Level: 10 HP: 10 Exp: 50 |
Drop: $400, Magic Missile |
Outer Wall, Underground Caverns, Cursed Prison (Saturn only) |
||
| Skeletons equipped with rifles. | Weak: Holy Level: 8 HP: 24 Exp: 20 |
Drop: Magic Missile, Talisman |
Colosseum, Outer Wall |
||
| Knight armed with Greatsword. | Level: 11 HP: 61 Exp: 80 |
Drop: Cutlass, Bekatowa |
Clock Tower, Outer Wall |
(Strategy) | |
| Boss | |||||
| Shape-shifting demon. | Level: 10 HP: 120 Exp: 500 |
Guard: Life Vessel, Gladius |
Outer Wall |
Weapons: Short Sword, Dagger (Dagger Throw) Abil: Bat Form (Wing Smash), Mist Form | |
Item Data
- Hover mouse over the "(...)" in the Found column for more details on how to find an item in the Outer Wall.
| Item Data: Outer Wall | ||||||||
|---|---|---|---|---|---|---|---|---|
| Image | Name - Game Type - Users Description |
Attributes / Consume | Statistics / Sell | Found | Notes | |||
| Sparkling ring [salable] | ATT + 1 (with Jewel Sword - Saturn only) Sell: $150 |
Find: Outer Wall (all) Drop: Merman, Blue Raven Create: Jewel Sword |
||||||
| Castlevania pot roast [use] | HP +50 |
Find: Outer Wall (hidden) (...) (all) Drop: Flail Guard |
||||||
| Jewel reinforced knuckles | Attrib: Hit |
ATT +21 |
Find: Outer Wall (secret) (all) Drop: Rock Knight |
Effect: Punch | ||||
| Polished to resist stoning | Attrib: Stone |
DEF +3 |
Find: Outer Wall (secret) (all) |
Effect: Grants immunity to Stone status | ||||
| Weak but quick, it flies in a straight path when thrown. (...) | Attrib: Holy/Cut Consume: 1 Heart (Alucard/Richter), 4 (Maria) |
ATT +5 (Alucard); ATT +20 (Richter); ATT +10 (Maria) |
Find: Outer Wall (...) (all) |
Effect: Knife Throw (Alucard/Richter); Triple Dagger (rapid succession, Maria) Special: Item Crash (1,000 Blades, Richter only; Cost: 10 Hearts; ATT +20, Attrib: Holy/Cut) | ||||
| Increases the player's maximum HP (life) capacity. | Maximum HP +5 (Alucard); maximum HP +10 (Richter and Maria) |
Find: Outer Wall (reward) (...) (all) Drop: Most bosses |
Effect: Restores all life and increases Max HP | |||||
| Sword of ancient Rome |
Attrib: Cut |
ATT +3 |
Find: Outer Wall (after defeating Doppleganger10) |
|||||
| Increases the player's maximum HP (life) capacity. | Maximum HP +5 (Alucard); maximum HP +10 (Richter and Maria) |
Find: Outer Wall (...) (all) Drop: Most bosses |
Effect: Restores all life and increases Max HP | |||||
| Increases the player's maximum heart capacity. | Max Hearts +5 |
Find: Outer Wall (...) (all) |
Effect: Increases Max Hearts (Alucard-only); restores 30 Hearts (Richter and Maria-only) | |||||
| Assails foes with holy scripture. (...) | Attrib: Holy Consume: 5 Hearts (Alucard/Richter/Maria) |
ATT +8 (Alucard); ATT +5 (Richter); ATT +15 (Maria) |
Find: Outer Wall (...) (all) |
Effect: Spins around the character. Two can be active simultaneously (Richter and Maria only) Special: Item Crash (Richter only; Cost: 15 Hearts; ATT +80, Attrib: Hit) | ||||
| Transform into Wolf | Find: Outer Wall (inaccessible at first) (...) (all) |
Effect: Enables Wolf Form ability | ||||||
| Valuable ring [salable] | ATT + 16 (with Jewel Sword - Saturn only) Sell: $5,000 |
Find: Outer Wall (requires Leap Stone) (...) (all) Drop: Wereskeleton Create: Jewel Sword |
||||||
Gallery


Related Stages
- Marble Gallery - Previous stage for Alucard
- Long Library - Next stage for Alucard
- Entrance - Accessible from Teleporter, initially accessed from Outer Wall. Other areas later also accessible at Teleporter when the other Teleporters found.
- Clock Tower - Connected area. Initially accessible to a point. Leap Stone is required to get further into it.
Castlevania Puzzle: Encore of the Night
The Outer Wall in Castlevania Puzzle: Encore of the Night includes some enemies from the original Outer Wall.
| Enemy Data: Castlevania Puzzle: Encore of the Night | |||||
|---|---|---|---|---|---|
| Image | Name - Game Description |
Statistics | Items | Location | Notes |
| ' | HP: 130 Exp: ~160 |
Drop: Cheese, Frankfurter; Six of Skulls Steal: ~60C |
Outer Wall |
Abil: Medusa's Gaze - Turns (unknown formula) of the players blocks inactive. | |
| ' | HP: 90 Exp: ~175 |
Drop: Cheese; ??? Steal: ~55C |
Outer Wall |
||
| ' | HP: 100 Exp: ~100 Timestop: Cheese, Frankfurter; Six of Crosses |
Steal: ~60C |
Outer Wall |
Weapons: Axe, Axe Knight Shield | |
| Boss | |||||
| ' | HP: 600 Exp: +1 level |
Drop: ??? Steal: ??? |
Outer Wall |
Abil: ??? | |